Since a few years I have been collecting temperature and humidity data from different rooms, such as the basement and bedroom. Especially for the bedroom, I wanted to make sure that the air does not get too dry or humid. So, I got some ESP8266 / NodeMCU and DHT22, and later I used BME280 and SHT3x sensors. In this article series, I want to describe how I collect the data, store them on a home server, and display them on a Bluetooth-enabled Palm OS device.
The article is split into two parts: this first part is about building the “collector unit” with an ESP8266 / DHT22 and storing the data on a server. The second part is about the Palm OS Bluetooth application and how I got the data displayed via an ESP32 over Bluetooth on a Palm OS device.
Needed Parts
These parts are required for collecting the data and storing them on a server:
- A Linux server (e.g., a Raspberry Pi – v1 with 700MHz is good enough)
- One or more ESP8266 / NodeMCU
- One or more DHT22 sensors
Of course, it would work with other parts as well. I only listed these because these are the parts I used.
Setting up an ESP8266
At this point, I will skip the part of explaining how to set up ESP8266 with the Arduino IDE. There are already good tutorials that explain this very well, like this one: https://randomnerdtutorials.com/how-to-install-esp8266-board-arduino-ide/
In this section, I want to explain how to wire up the ESP8266 / NodeMCU with a DHT22 and get some data out of it.
The Wiring
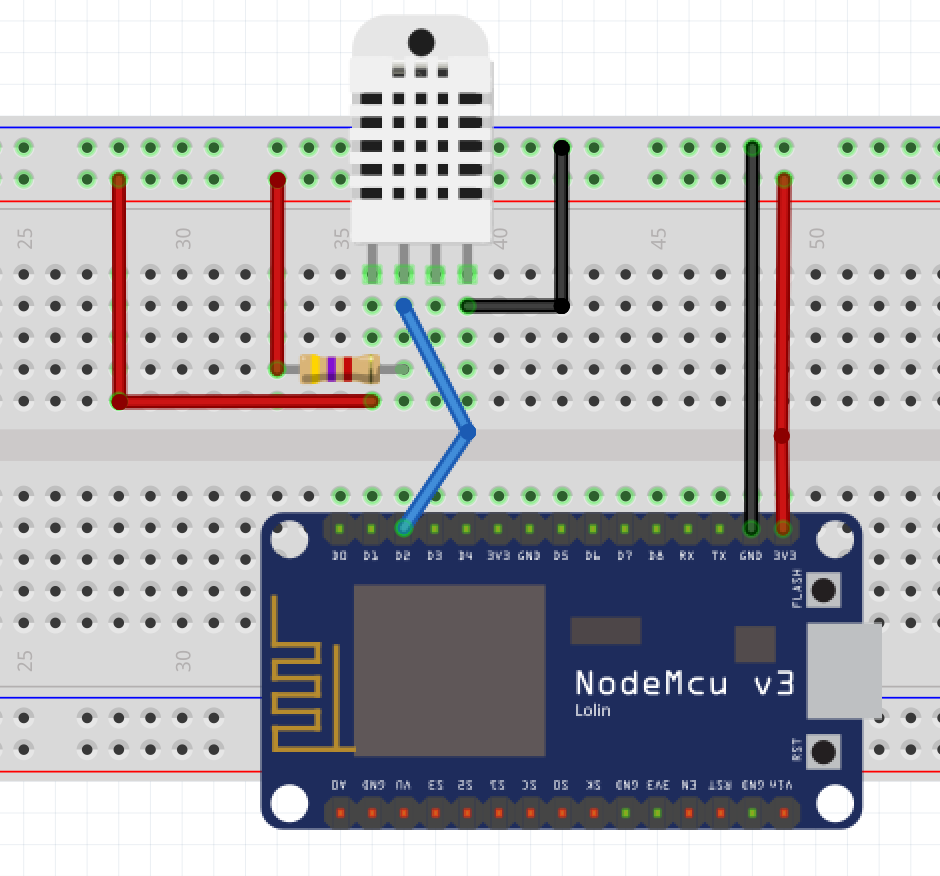
The wiring is straightforward: the first pin from the left of the DHT22 needs to be connected to 3.3V, the second pin to D2, and a 4.7kOhm resistor to 3.3V as shown in the picture. The third pin is left out, and the last pin (the right one) must be connected to the ground. That’s it. If you have a DHT22 already on a PCB with a resistor on it and three pins: Connect “VCC” to 3.3V, “DAT” to D2, and “GND” to ground.
The Code
An ESP8266 is not able to get data from a DHT22 by default, or at least to make things easier, it is recommended to install the “DHT” library. Just click in the Arduino IDE on “Tools” => “Manage Libraries” and search for "DHT sensor library" by Adafruit. It turned out that Version 1.2.3 works best; with newer versions, it was not possible to get useful values from the DHT22.
Show/hide source code
// Load needed libraries
#include <ESP8266WiFi.h>
#include <ESP8266WebServer.h>
#include <DHT.h> // Version 1.2.3 works fine


// Tell the ESP where it can find the DHT22
#define DHTPIN 4     // D2 = GPIO 4
#define DHTTYPE DHT22
DHT dht(DHTPIN, DHTTYPE);

// Wifi credentials
const char* ssid     = "MySSID";
const char* password = "myPassword";

// Default port 80 for our web server
ESP8266WebServer server(80);

void setup() {

  // For output on the serial monitor
  Serial.begin(9600);

  // Connect to Wifi
  startWIFI();

  // Register available paths on the server and a default one.
  server.on("/", handle_DefaultConnect);
  server.onNotFound(handle_NotFound);

  // Start the server
  server.begin();
}

void loop(){

  // Handle client's requests
  server.handleClient();

  // Connect to wifi if it is not connected
  if (WiFi.status() != WL_CONNECTED) {
      delay(1);
      startWIFI();
  }
}

// Function to send the current humidity and temperature to the client
void handle_DefaultConnect(){

  float h = dht.readHumidity();
  float t = dht.readTemperature(); // Default: Celsius

  // Check if any reads failed and try again
  while(isnan(t)){
    delay(200);
    t = dht.readTemperature();
  };

  while(isnan(h)){
    delay(200);
    h = dht.readHumidity();
  }

  String output = "";
  output += h;
  output += ";";
  output += t;
  output += ";";

  Serial.print("Sending: ");
  Serial.println(output);

  server.send(200, "text/html",output);
}

// Function to send the current humidity and temperature to the client
void handle_NotFound(){

  server.send(404, "text/plain", "404 - page not found");

}

// Function to connect to WiFi
void startWIFI() {

  Serial.print("Connecting to ");
  Serial.println(ssid);
  WiFi.begin(ssid, password);

  while (WiFi.status() != WL_CONNECTED) {
      Serial.print(".");
      delay(500);
  }
  Serial.println(".");

  // Print local IP address
  Serial.println("WiFi connected.");
  Serial.print("IP address: ");
  Serial.println(WiFi.localIP());

  delay(300);
}
First, we need to include the libraries for WiFi, the web server, and the DHT22. In lines 13 and 14, the credentials for the WiFi are set. After instantiating the WebServer with the default port 80 (line 17), the setup function is defined, in which the serial connection for debugging output gets established, the WiFi gets connected, and the web server registers the paths we want to call later. At the end, the web server gets started (line 32).
In the loop function, we need to tell the web server to handle incoming client requests (line 38) and reconnect to the WiFi if the ESP8266 gets disconnected.
The handle_DefaultConnect function simply tries to read the temperature and humidity from the DHT22 as long as the result isn’t a float value (lines 53 – 62). In the next step, the output string gets formatted (it is always like “humidity;temperature;”). We send the string to our serial monitor (lines 73, 74) and finally via the web server to the client (line 76).
If the client sends an unknown request, it just gets the information “404 - page not found” (line 82).
The function “startWIFI” (line 87) is not very complicated. In line 91, we try to connect to the WiFi and in line 93, we wait until it is connected. In line 102, we print the current IP address - that is all.
Setting up the Server
The server needs, besides from an OS (I would recommend Raspbian or Ubuntu Server Edition), the following software stack:
- Nginx
- PHP 7
Nginx is used later to provide the data we want to display on the Palm PDA. PHP 7 is used to fetch the data via a cron job periodically and store them in simple text files. So, we do not need a heavy MySQL server at this point. Also, moving the project to another server is a bit easier because you only need to copy the files to the other server, instead of exporting and importing them into a database. (I admit it's not the greatest time saver.)
Digital Ocean provides a great tutorial that explains how to install Nginx, PHP, and more on Ubuntu: How To Install Linux, Nginx, MySQL, PHP (LEMP stack) on Ubuntu 20.04
For Raspbian, you can follow these instructions on raspberrypi.org: https://www.raspberrypi.org/documentation/remote-access/web-server/nginx.md
Normally, the content you want to be delivered by the web server (in this case: Nginx) is located under “/var/www/html”. So, this is where these need to be:
- config.php: for config parameters like the IP addresses of the ESP8266
- dataGrabber.php: This script will fetch the data from the ESPs and store them on the disk
- dataProvider.php: This script will provide the data, which we want later display on a Palm
The config.php
The config.php only contains a static array with IP addresses as keys and the room names as values:
Show/hide source code
<?php

class Config
{

    static $config = [
        "192.168.1.50" => "Basement",
        "192.168.1.51" => "Bedroom",
    ];

    CONST WORKINGDIR = "data";

}
The advantage of this config.php is that we can easily integrate it with the other PHP scripts and at the same time have a central place where we can make changes.
The dataGrabber.php
The dataGrabber.php has the task of grabbing/fetching the data from the ESP8266 and storing it in a text file. It is not very complicated and can look like this:
Show/hide source code
<?php

require_once ("config.php");

class DataGrabber
{

    /**
     * Main function to start this program
     */
    public function run(){

        $config = Config::$config;

        foreach ($config as $ip => $name){
            $rawData = $this->fetchData($ip);
	    if(!isset($rawData)){
		throw new Exception("faulty data from temp_hum_sensor!");
   	    }
            $processedData = $this->processData($rawData);
            $this->writeToFile($processedData, $name);
        }

    }

    /**
     * Receive data from HTTP Request
     *
     * @param String $ip
     * @return array|null
     */
    protected function fetchData(String $ip){

        //$data = "83.50;10.00;";
        $data = file_get_contents("http://".$ip);
        if(preg_match('/^(\d{1,3}\.\d{1,3}\;){2}/', $data)){
            return $data;
        }

        return null;
    }

    /**
     * Appends additional data
     *
     * @param $data
     * @return String|null
     */
    protected function processData(String $data){

        if(isset($data)){
            $items = explode(';',$data);
            array_pop($items);
            $time = date("Y-m-d H:i:s", time());
            return $time.';'.implode(';',$items);
        }
        return null;
    }

    /**
     * Write processed data to a certain file
     *
     * @param String $data
     * @param String $sensorName
     */
    protected function writeToFile(String $data, String $sensorName){

        if(isset($data)){

            $fullDirPath = __DIR__."/".Config::WORKINGDIR."/";
            $fullFilePath = $fullDirPath.$sensorName.".txt";

            if(!is_dir($fullDirPath)){
                mkdir($fullDirPath, 0755, true);
            }

            if(!is_file($fullFilePath)){
                touch($fullFilePath);
            }

            file_put_contents($fullFilePath, $data, LOCK_EX);
        }
    }
}

$dataGrabber = new DataGrabber();
$dataGrabber->run();
function run()
This is the entry point of the script and gets called when we call the script via “http://<server-ip>/dataGrapper.php”. In the last two lines, we instantiate the class and call the run function:
	$dataGrabber = new DataGrabber();
	$dataGrabber->run();
The run function itself simply calls the following functions for each configured sensor in the config.php:
- fetchData()
- processData()
- writeToFile()
function fetchData(String $ip)
This function simply downloads the data from an ESP8266 via an HTTP request. The data gets verified and returned by the function. If the data is not valid, it just returns null.
function processData($data)
This function appends the time string so we know when the temp/hum data was recorded and returns the formatted data, which we want to display on a Palm PDA.
function writeToFile($data)
This function stores the fetched data into a text file, so we do not have to wait until the ESP8266 reads the data from the sensor (DHT22).
The dataProvider.php
Show/hide source code
<?php

require_once ("config.php");

class DataProvider
{

    public function provideData(){

        $data = '-1,-1,'.date("Y-m-d H:i:s", time());
        $sensor = $_GET['sensor'] ?: '';

        if(in_array($sensor, Config::$config)){
            $filename = Config::WORKINGDIR.'/'.$sensor.'.txt';

            if(file_exists($filename)){
                $data = file_get_contents($filename);
            }
        }

        echo $data;
    }
}

$dataProvider = new DataProvider();
$dataProvider->provideData();
The dataProvider only contains one function: “provideData()”. This function expects the sensor name as a GET parameter, checks if this name exists in the config, and if so, it will read and output the stored value in the text file, which was written by the dataGrabber.php. If the sensor name does not exist or the text file is not present, the function returns a default value: "-1,-1,<currentDateTime>". If we see this later on the Palm PDA, we know that something went wrong. Of course, we could implement error reporting at this point, but I think it is a bit too much for such a simple task. At least we do not deal with highly sensitive data.
Testing the Setup
When the files (config.php, dataGrabber.php, and dataProvider.php) are saved in the document root of the web server (default path: “/var/www/html”), it should be possible to call them via a web browser:
- http://<server-ip>/dataGrabber.php
- http://<server-ip>/dataProvider.php
The call of “http://<server-ip>/config.php” should provide no output. We could now configure an .htaccess file to deny the call of “config.php”. This would make sense for a public server. (In the case that you are using a public server, it would be a good idea to protect the complete application via basic authentication.) Another possibility would be to store the config.php outside of the document root.
Final Thoughts
Now, we have all the needed parts for the next step: an ESP8266 (or more) to read the humidity and temperature, a dataGrabber, which collects the wanted data. Also, the dataProvider, which simply outputs the collected data via an HTTP request. In order to collect the data, we need to create a cron job, which periodically executes the dataGrabber.php. With the command “sudo crontab -e” on the Linux server, this line can be added:
*/30 * * * * php /var/www/html/dataGrabber.php
This executes the PHP command every 30 minutes. Of course, it would be possible to fetch the information more often, by changing the 30 to something lower. Save the Cron file, and the system is ready.
The system is easy to extend. Just flash another ESP8266, add the IP to config.php, and that’s it.
In part two, we will flash an ESP32, which has Bluetooth and write a small Palm OS application, which requests data from the ESP32 and displays it: Bluetooth Communication with Palm OS - The Palm OS Application (Part 2/2)